
Whether you’re the one getting married or you simply have a fridge that just can’t hold any more save the dates for this summer, wanting your smile to look better in wedding photos is completely normal—especially if your goal is to achieve dazzling pearly whites for the big day.
Between fittings, travel plans, parties, and packed schedules, teeth whitening usually becomes a last-minute thought.
The good news is that it doesn’t have to be stressful.
Starting your whitening routine 6 to 8 weeks before the wedding or event gives you enough time to see noticeable results without rushing or overdoing it right before the big day.
This guide covers the full week-by-week timeline, the honest comparison between professional and at-home options, different teeth whitening methods, how to manage sensitivity, what to eat (and avoid) for best results, and how to ensure your smile is shining bright by the big day.
Key Takeaways
-
Start 6 to 8 weeks out. That window gives your shade time to build, your enamel time to settle, and you time to troubleshoot without panic.
-
Schedule a dental consultation 4 to 6 weeks before the wedding. Meeting with your dentist allows you to discuss whitening options, create a treatment plan, and ensure your approach is safe and effective.
-
Choose dentist recommended products and those with the ADA Seal of Acceptance. This ensures your whitening method is both safe and effective, as endorsed by dental professionals.
-
Whitening strips and teeth whitening trays are cost-effective, dentist recommended options. These products, often using bleaching agents like hydrogen peroxide, can show results in 2 to 6 weeks depending on individual factors.
-
At-home kits genuinely deliver. Strips typically show 1 to 2 shade improvements within 7 to 14 days of consistent use, and LED-activated kits push that further over a full whitening cycle.
-
Sensitivity is common but manageable.About half of at-home whitening users experience mild sensitivity, which resolves on its own within 24 to 48 hours.
-
Diet directly affects your results. After each session, the enamel is temporarily more porous, which means that staining pigments from coffee, wine, and tea absorb faster and more deeply than usual.
-
Whiten as a couple, on the same timeline. If one partner has noticeably brighter teeth in photos, it is obvious in every high-resolution shot. The fix is coordinating from day one.
-
Never test something new the night before. First-time use right before the wedding is how you end up with gum irritation and uneven results on the most photographed day of your life.
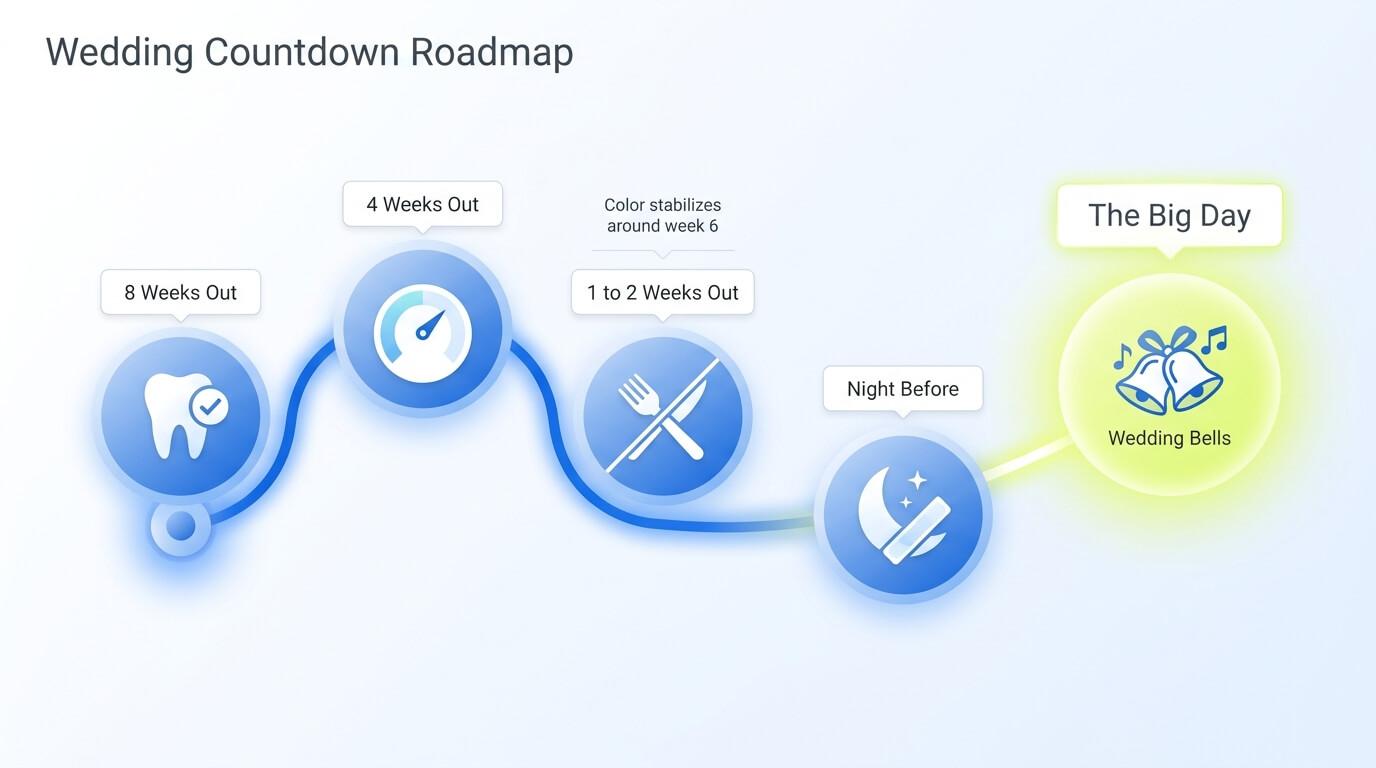
Your Week-by-Week Whitening Timeline: 8 Weeks Out to the Night Before
We all want to look our best before a big event, but that doesn’t mean you should try to rush results. The 6 to 8 week recommendation isn’t arbitrary.
For maximum results, start by scheduling a professional cleaning with your dentist a few months before the wedding. This will remove plaque, tartar, and surface stains, preparing your teeth for whitening treatments and helping you achieve the best possible outcome.
Your enamel needs time to adjust to a whitening routine, your shade needs time to stabilize, and most importantly, you need enough runway to troubleshoot sensitivity or plateau periods before they become a problem. Touch up treatments can also help maintain your whitening results as the big day approaches.
Here’s exactly what to do at each stage.
8 Weeks Out: The Ideal Starting Point
Before starting any sort of teeth whitening routine, get a quick dental check-up. Whitening over untreated cavities or inflamed gums can make underlying issues worse, not better. Once you are cleared, start teeth whitening with good oral hygiene practices, including brushing, flossing, regular dental visits, and using whitening toothpaste to help remove surface stains and maintain results. Commit to your routine consistently.
As part of your oral hygiene, using diluted hydrogen peroxide rinses may help lift stains and further brighten your smile.
A foundational clinical trial of carbamide peroxide whitening gel found that color stabilizes around week 6 of consistent use, which is why the extra runway matters so much before a wedding or other photo-heavy event.
4 Weeks Out: Assess and Adjust
At 4 weeks, take an honest look at your progress.
Has your shade shifted noticeably?
Has any sensitivity shown up during or after sessions?
This is the right moment to adjust the frequency or formula, not to blindly push through to the end. When selecting whitening products, check for effective active ingredients like hydrogen peroxide or carbamide peroxide, as these are responsible for breaking down stains and discoloration.
If sensitivity becomes uncomfortable, try spacing sessions out to every other day instead of daily. Clinical studies consistently show that lower-concentration products used with rest days produce comparable results to daily use while significantly reducing nerve discomfort.
If your results feel like they’ve plateaued, consider whether adding an LED accelerator would help move the needle during this final stretch.
That combination of serum plus light activation is what distinguishes the better at-home systems from basic strip routines. Y
ou might also consider incorporating a whitening mouthwash into your routine, as it can help remove surface stains, freshen breath, and maintain results between whitening treatments.
1 to 2 Weeks Out: Time for the Finishing Touches
Keep your routine going through this window, but resist the urge to overuse. Over-whitening in the final week or two does not produce extra shade lift; it produces irritated gums and increased sensitivity right before you need to be at your best.
This is also when you should start to get stricter about what you eat and drink.
After each whitening session, enamel is temporarily more porous than usual, so it's important to avoid heavily pigmented foods and drinks for at least 48 hours following peroxide treatment, as these staining factors—such as coffee, red wine, black tea, tomato sauces, dark berries, soy sauce, balsamic vinegar, and dark sodas—can quickly discolor your teeth.
For best results, use a whitening agent containing peroxide and be mindful of these staining factors to maintain your brighter smile.
The Night Before: The One Rule That Matters Most
A single short touch-up the night before is completely fine if you’ve been whitening consistently for weeks, helping you maintain your pearly white smile for your perfect wedding day smile. What’s not fine, however, is using any whitening product for the very first time the night before the wedding.
Sensitivity, gum irritation, and uneven application are all real risks when enamel hasn’t had time to adjust to a new formula.
Avoid staining foods at dinner, do your usual touch-up if you have one, and don’t introduce anything your teeth have not seen before. If you’ve had professional whitening, it’s best to wait at least 48 hours before consuming staining foods to prevent re-staining and keep your smile bright. The brides, grooms, and guests who feel most confident on the morning of the wedding are overwhelmingly the ones who kept the night before simple.
Professional Whitening vs. At-Home Kits: Which One Should You Choose?
This is the question almost every bride or groom asks first, and the honest answer is that both options can get you to a visibly brighter smile before the big day. However, professional teeth whitening results can be achieved quickly—often in about one hour—making them a popular choice for those looking to enhance their smile shortly before the wedding.
The right choice depends on your timeline, your sensitivity history, and the amount of bandwidth you have for dental appointments right now.
For optimal teeth whitening results, consider scheduling a professional teeth cleaning before your whitening treatment, as this helps remove surface stains and plaque, allowing the whitening agent to work more effectively.
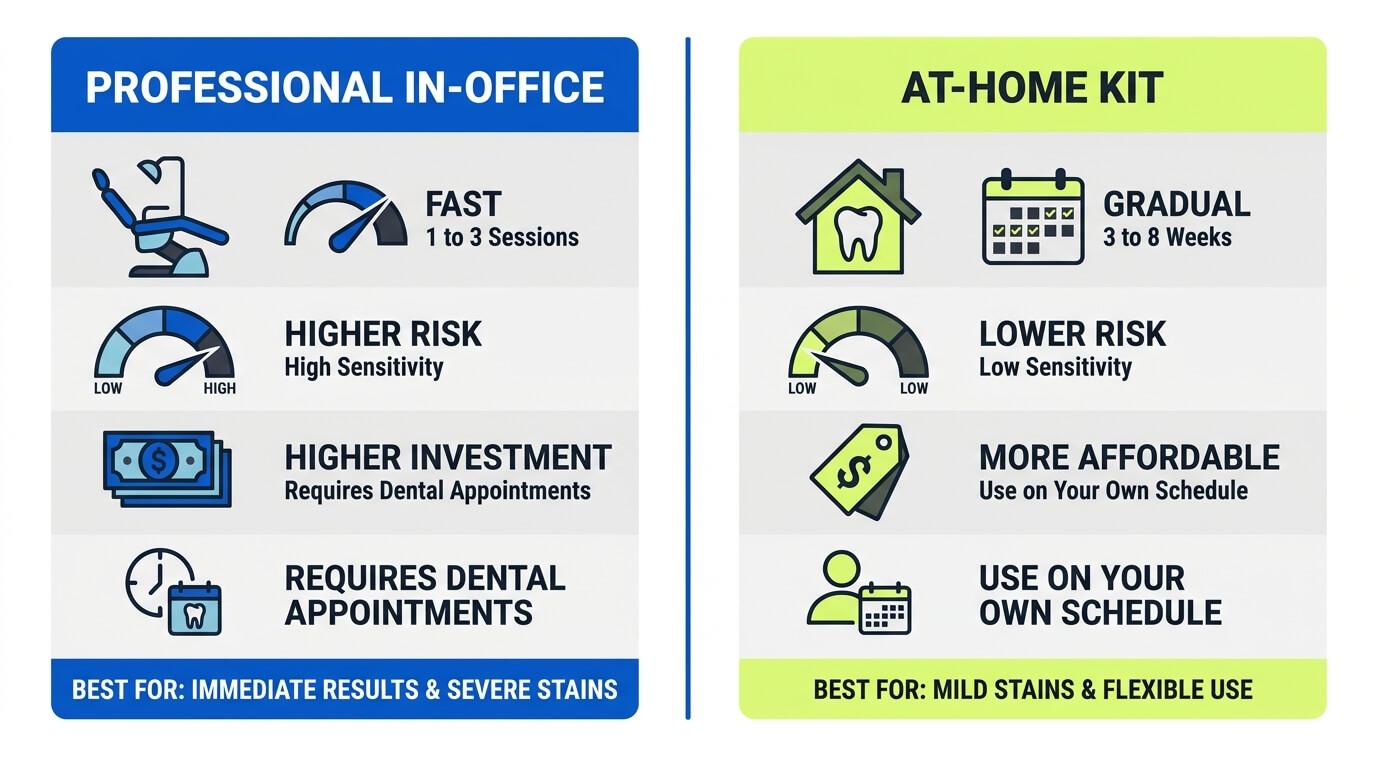
What Professional In-Office Whitening Delivers
In-office teeth whitening, most commonly Zoom whitening, is performed in a dental office using a high-concentration hydrogen peroxide gel, typically ranging from 25% to 43% (usually around 35%). This is much higher than at-home options, which usually contain about 10% hydrogen peroxide. The gel is activated by an LED light, and results can be significant in 1 to 3 sessions, making it ideal for those starting 4 weeks or less out.
Professional whitening treatments typically cost between $300 and $1,000 per session, depending on the clinic, location, and treatment type. Custom-made professional whitening trays, provided by a dentist, can also yield faster and more dramatic results compared to over-the-counter options, often achieving desired whiteness in 2-4 weeks.
By comparison, at-home kits like the SNOW Diamond Series Teeth Whitening Kit start at $79 and are designed for gradual whitening over time.
The tradeoff is sensitivity. In-office treatments with 40% hydrogen peroxide produce the largest increase in sensitivity scores compared with at-home alternatives, with sensitivity peaking within 24 hours of treatment.
If you go this route, schedule your final in-office session at least two weeks before the wedding so your enamel has enough time to fully settle before portraits.
Why At-Home Kits Work for Most Brides
At-home whitening has caught up with professional options over the past decade, making it a great option for anyone looking for a pre-wedding boost. Popular at-home options include whitening strips, white strips, and teeth whitening trays, which are easy to use and suitable for sensitive teeth.
Research shows that consistent use of peroxide-based at-home systems, which typically use hydrogen peroxide as the bleaching agent, produces results comparable to in-office treatments for most patients, just on a longer timeline.
At-home whitening strips and trays are generally more budget-friendly but may require 2 to 6 weeks of consistent use to achieve desired results, depending on the individual's teeth and the product used.
LED-activated kits give you more even coverage across the full surface of each tooth than strips do, which matters when a photographer is shooting close-up portraits all day.
They also tend to produce significantly lower sensitivity scores in clinical comparisons to in-office treatments.
SNOW’s Diamond Series Teeth Whitening Kit is dentist-formulated, pairs a whitening serum with an LED accelerator mouthpiece, and is built for consistent, gradual results that fit into any schedule.

Sensitive Teeth and Whitening: What You Need to Know Before the Wedding

Sensitivity is the single biggest reason people put off whitening before a wedding, and then regret it later when they see the photos. Tooth sensitivity and gum sensitivity are common side effects of whitening treatments, often causing temporary discomfort or irritation.
The fear is real and understandable, but it’s also far more manageable than most people realize. Practicing good oral hygiene—brushing twice daily with an electric toothbrush, flossing, and using fluoride mouthwash—can help manage sensitivity and support optimal whitening results.
Why Sensitivity Happens and How Long It Lasts
When hydrogen peroxide comes into contact with your teeth, its low molecular weight lets it diffuse through enamel and dentin, allowing the whitening compounds to reach deeper stains through a process called teeth bleaching.
This makes it effective at removing deep stains that regular toothpaste may not address. That same diffusion is what allows the bleaching agent to reach your nerve endings, causing the sharp, fleeting sensitivity known as “zingers.”
Roughly half of at-home whitening users experience mild sensitivity, about 10% experience moderate sensitivity, and only 4% experience severe sensitivity. In all cases, it is temporary and resolves within 24 to 48 hours of stopping a session.
Be cautious with many viral natural home remedies for teeth whitening, as they are often abrasive or acidic and can permanently damage enamel.
There’s also a factor that almost never gets mentioned in wedding prep: Stress-driven teeth grinding, clinically called bruxism.
People with high anxiety are more than twice as likely to grind their teeth, and bruxism gradually thins enamel over time, which means the bleaching agent reaches your nerves faster.
If you’ve been waking up with jaw tension or headaches during wedding planning, bring it up with your dentist before you start any whitening routine.
How to Manage Sensitivity Before and During Your Routine
The good news is that lower-concentration formulas used with rest days between sessions consistently produce far lower sensitivity rates than high-concentration treatments. You don’t have to choose between comfort and results, and you can still achieve noticeable whitening effects.
These habits make a real difference regardless of which product you use:
-
Space sessions every other day instead of daily, so your enamel has recovery time between treatments
-
Use a potassium nitrate sensitivity toothpaste on days between sessions, since potassium nitrate is clinically shown to calm nerve signals in the tooth
-
Avoid extremely hot or cold drinks for a few hours immediately after whitening
-
If you suspect stress-driven grinding, mention it to your dentist before starting, so they can assess your enamel thickness
-
Maintain good oral hygiene to help prolong whitening effects and keep your smile bright
Foods and Drinks to Avoid During Your Whitening Journey
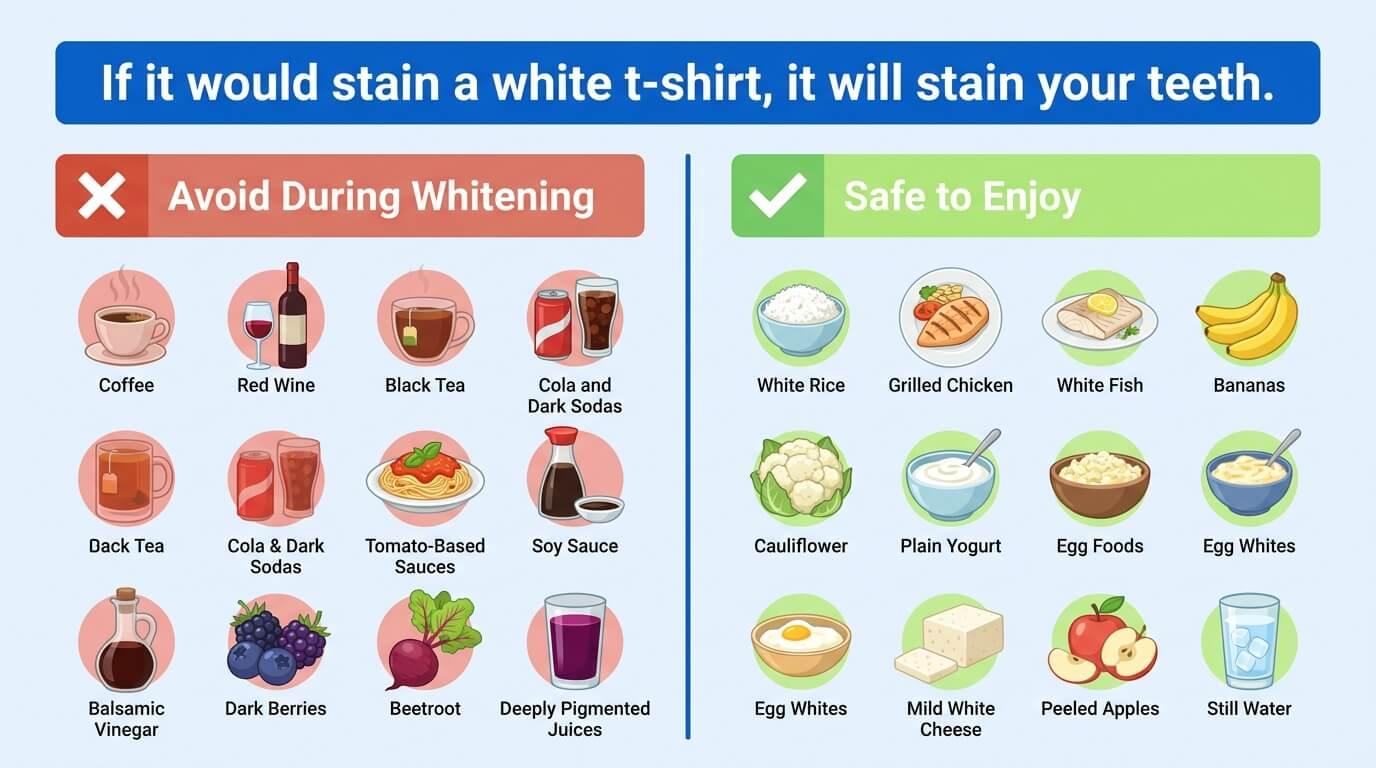
You can do everything right with your whitening routine and still undo real progress at dinner. After each whitening session, your enamel is temporarily more porous than usual, which means staining compounds from food and drinks penetrate more quickly and deeply than they otherwise would.
Avoiding certain foods and drinks during this time helps prevent surface stains and remove stains, keeping your teeth looking their brightest.
The rule is simple and easy to remember: If it would stain a white t-shirt, it will stain your teeth, and it will do it faster right now than at any other point in your routine.
To further protect your smile, consider using a straw when drinking staining liquids like coffee, tea, or cola to reduce their contact with your teeth, especially the front smile zone.
What to Eat to Protect Your Results
The white diet concept, particularly useful in the 48 hours before a wedding, is exactly what it sounds like: lean proteins, light grains, and pale-colored produce that don’t carry staining pigments.
Think grilled chicken, white fish, plain yogurt, bananas, cauliflower, egg whites, and peeled apples. The goal is to give your freshly whitened enamel the cleanest possible environment to hold its new shade all the way through the first dance.
Additionally, stay hydrated by drinking plenty of water, as this helps maintain a bright smile and supports overall oral hygiene.
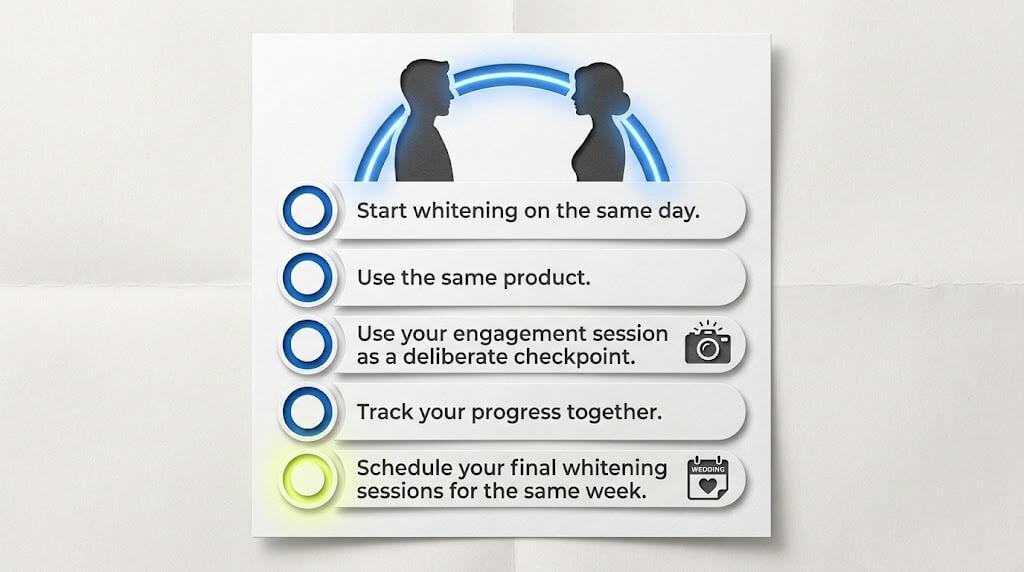
Couples Whitening: How to Coordinate Results for Photos
This is the most overlooked part of pre-wedding smile prep, and one of the most impactful. Wedding photos capture both of you together, in sharp detail, across hundreds of frames. If one partner’s smile is noticeably brighter than the other’s, every photographer in the world will tell you it shows.
Coordinating your whitening helps both partners achieve their best smile for wedding photos. The fix is not complicated: Start on the same day, use the same product, and let your shades develop in parallel. That’s what makes your smiles look like they belong together in every photo rather than an accidental before-and-after comparison.
Using Engagement Photos as a Whitening Trial Run
Engagement sessions typically take place three to six months before the wedding, making them the smartest whitening test run you can get. Use that shoot as your real-world trial for your full bridal teeth whitening routine and see exactly how your bridal teeth look in photos.
If your shade looks great, you know your product works. If sensitivity showed up or the shade fell short, you have months to course-correct. That is the cushion that makes engagement photos more than just a romantic milestone; they are practical intelligence for your wedding day.
Couples’ whitening coordination tips:
-
Start whitening on the same day, so your shade progression stays in sync from the beginning
-
Use the same product for consistent, matching coverage across both of you
-
Use your engagement session as a deliberate checkpoint to assess shade and sensitivity before the wedding
-
Track your progress together and adjust session frequency if one partner responds faster
-
Schedule your final whitening sessions for the same week before the wedding, so you arrive on the day matched
What to Realistically Expect from Teeth Whitening Before a Wedding
The best thing you can do before starting is set realistic expectations—not because the results aren’t real, but because understanding what shapes them helps you make smarter decisions and feel less stressed throughout the process. Achieving a whiter smile is possible with consistent effort, and for those seeking gentle, chemical-free options, natural teeth whitening methods are available.
How Many Shades Whiter Can You Actually Get?
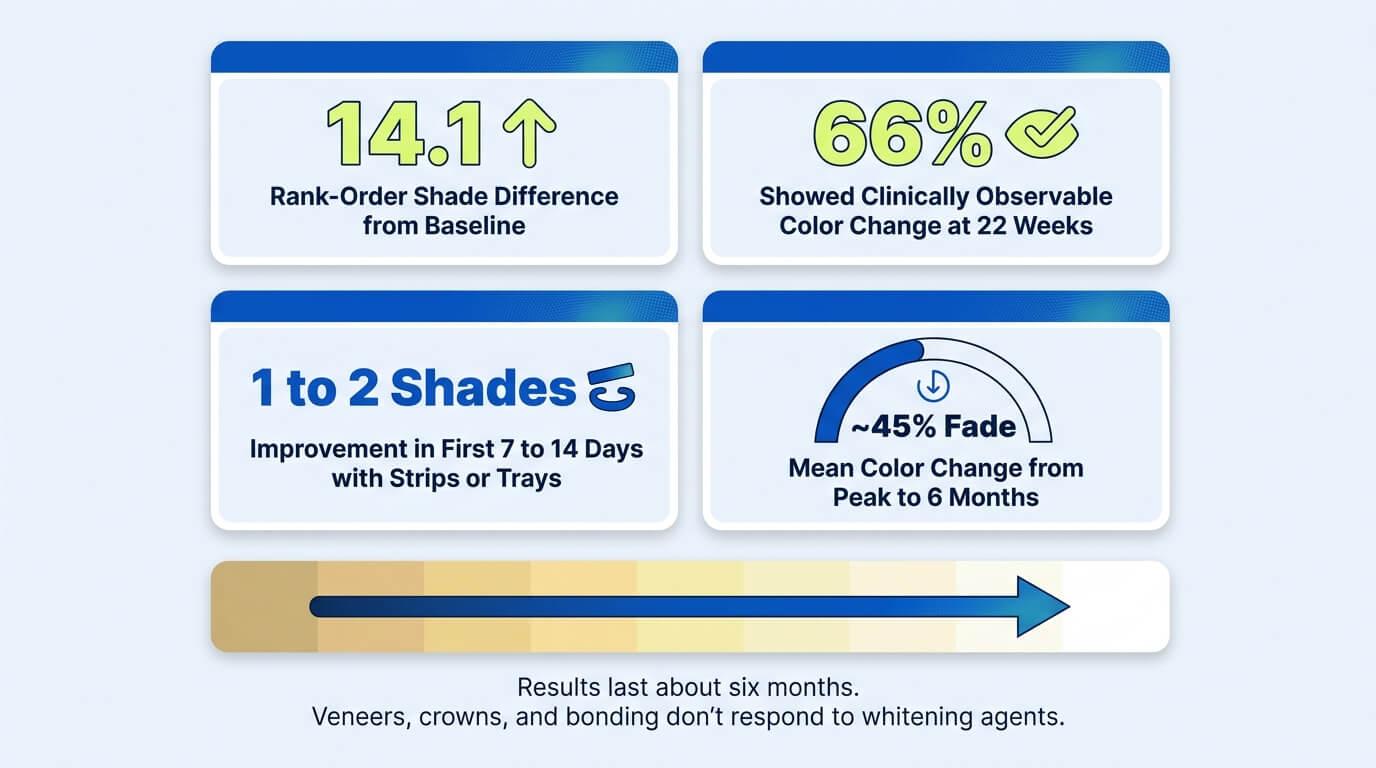
Patients using whitening gels showed a 14.1 rank-order difference in shade from baseline, with 66% showing a clinically observable color change in photographic assessment at 22 weeks. Results depend significantly on your starting shade, the type of stains present, the teeth whitening method chosen, and the whitening agent used.
Teeth whitening products generally work by using active ingredients like hydrogen peroxide or carbamide peroxide, which penetrate the enamel and break down stains, leading to a whiter appearance.
For at-home systems specifically, strips and tray-based methods typically deliver 1 to 2 shade improvements within the first 7 to 14 days of consistent use. LED-activated kits extend and accelerate that lift over a longer routine.
One thing worth knowing before you start: Natural tooth enamel responds to whitening agents, but veneers, crowns, and bonding don’t. If you have restorations on visible teeth, your dentist can help you plan a realistic shade target before you begin.
How Long Do Results Last After the Wedding?
Whitening results aren’t permanent, but they are maintainable. Results typically last about six months, so planning ahead is crucial to ensure your smile looks its best on your wedding day. The mean color change from the whitening peak to six months out is approximately 45%, indicating your results will gradually fade over time, especially when exposed to staining factors like coffee, tea, wine, and certain foods.
The good news is that touch up treatments once or twice a week using a whitening pen or your kit are enough to hold your shade for months without over-whitening. Touch up treatments are important to maintain your whitening results and extend their longevity. For best results:
-
Avoid staining foods and drinks for 48 hours after each touch-up session
-
Bring a SNOW® Extra Strength Teeth Whitening Pen on your honeymoon since it is compact, fast, and works in about 60 seconds
-
Resume your normal at-home routine when you return and adjust frequency based on your diet
The Extra Strength Pen is what brides reach for on honeymoon dinners and beach days when they want to keep their wedding-day results going without any disruption to their plans.
Starting Late? Your Last-Minute Whitening Options
Starting late isn’t ideal, but it’s not a dead end either. Even one to two weeks of consistent whitening produces a noticeable shade improvement that shows up in photos. The key is choosing the right approach for how much time you actually have.
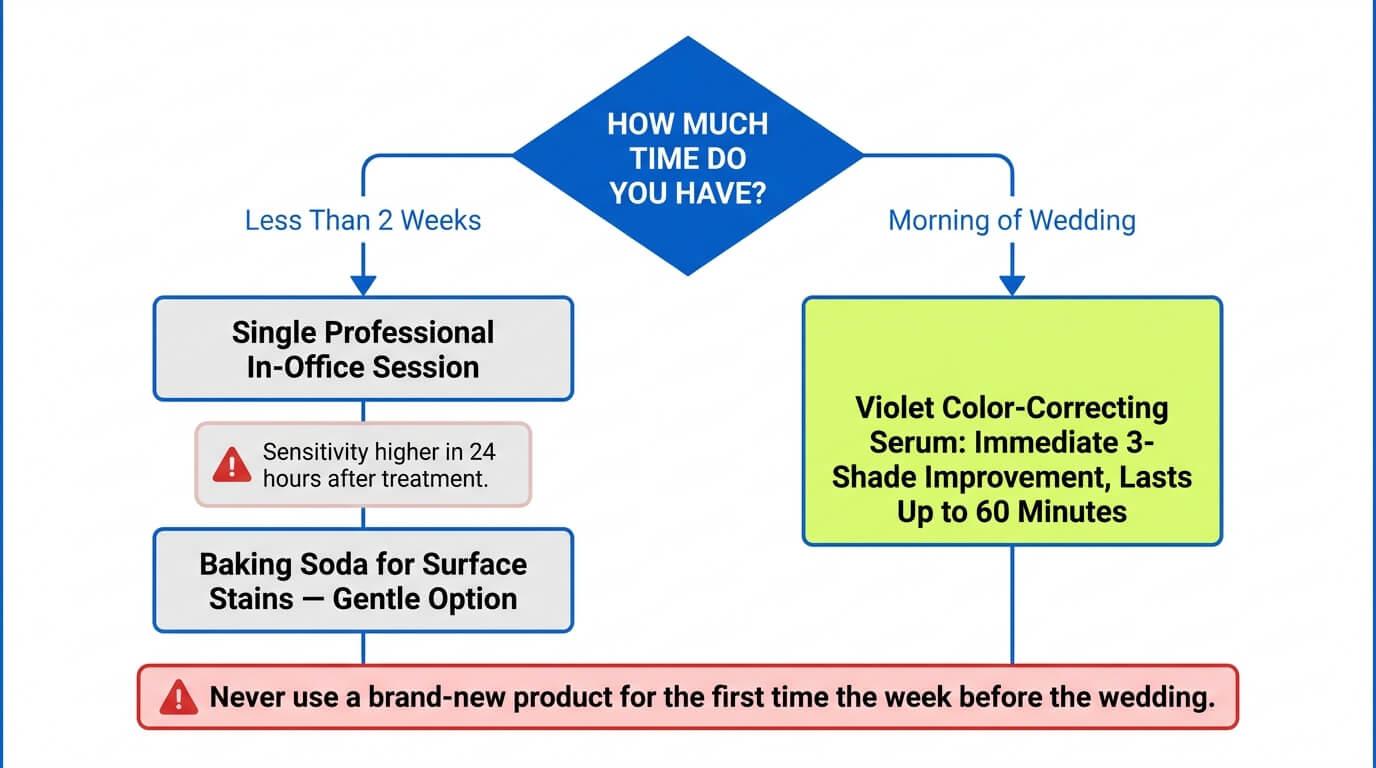
If you have less than two weeks, a single professional in-office session is your fastest route to visible results. Clinical data show that in-office treatments deliver significant shade change immediately, though sensitivity in the 24 hours after treatment tends to be higher than with at-home alternatives.
For last-minute improvements, using baking soda as a natural teeth whitening remedy can help remove surface stains thanks to its gentle, gritty texture—just mix a small amount with water and brush gently to brighten your smile. However, avoid acidic fruit hacks like lemon juice or apple cider vinegar, as these can erode protective enamel and actually increase your susceptibility to deep staining.
For the morning of the wedding itself, a color-correcting product is the most practical tool. A single application of a violet color-correcting serum delivers an immediate three-shade improvement, with results lasting up to 60 minutes. That’s exactly the kind of lift you need right before the ceremony photos.
SNOW’s Purple Serum uses the same color-correcting technology to deliver instant visible brightness before you walk out the door. No whitening cycle, no waiting.
One firm rule, regardless of your timeline: Do not use a high-concentration treatment or a brand-new whitening product for the very first time in the week before a wedding. Sensitivity and uneven results are real risks when enamel has not had time to adjust, and your wedding morning is not the moment to find that out.
Final Thoughts
Starting early, picking the right product, and managing sensitivity are the three things that separate a confident, radiant smile from a stressful one on your wedding day. The ultimate goal is to achieve pearly whites and whiter teeth that will shine in every photo, making your special day even more memorable. Your timeline matters more than any individual product, and the decisions you make in the next few weeks show up in every photo you keep for the rest of your life.
SNOW has served over 2.4 million smiles, collected 15,500+ five-star reviews, and been featured in Forbes, Cosmopolitan, GQ, and Oprah Daily. Every product in the lineup is dentist-formulated for real, at-home results.
Whether you are 8 weeks out or 8 days out, there is a product built for exactly where you are right now. Shop All SNOW® Teeth Whitening Products and get 20% off your order today.
FAQs About Whitening Your Teeth Before a Wedding
Got any more questions before the big day? Here are some of the most common things people ask about whitening their teeth before a wedding.
How long before a wedding should I start whitening my teeth?
Six to eight weeks out is the ideal window for a reason: It’s important to start teeth whitening early to achieve the best results for your wedding day. This timeframe gives your enamel time to adjust, your shade time to stabilize, and you time to troubleshoot before any of it matters. Four weeks is the realistic minimum if you want results that are visibly different in close-up photography.
How often should I whiten my teeth in the weeks before the wedding?
Most at-home kits work best with daily or every-other-day use in the early weeks. Once you hit your target shade, scale back to two or three times per week to maintain it. If sensitivity appears at any point, spacing sessions further apart is always the smarter call.
Will my teeth go yellow again after whitening?
Yes, gradually. Approximately 45% of whitening results fade within six months, particularly with regular coffee, tea, and wine consumption. Consistent small touch-ups and a little diet awareness after the wedding significantly slow that process.
What is the fastest way to whiten teeth before a wedding?
A single professional in-office session is the fastest path to a visible shade change, often delivering dramatic whitening effects quickly—many people see noticeably whiter teeth in just one to three appointments. At-home kits used daily for one to two weeks can still lift your shade meaningfully, with significantly less risk of sensitivity.
If the wedding is just days away, a color-correcting serum is the most practical option for immediate brightness. A single application can deliver a visible three-shade improvement that lasts up to 60 minutes, covering your ceremony and portraits with ease.


